Whilst many Travel Brands are flocking to Facebook Ads and Google Ads (with good reason, as they do work), there’s a huge, under-rated and ripe opportunity happening over on YouTube with YouTube Video Advertising – or YouTube Ads as I’ll refer to it in this Ultimate Guide.
So why aren’t we seeing many Travel Brands using YouTube Ads?
Well, the main reason we’ve come across is “…because video is too complicated/too expensive”
And, yes, there is a cost (or an investment) into producing YouTube Ads, but in order to ‘win’ in today’s crowded marketplace, Travel Brands need to “…speculate to accumulate.”
In other words, you need to invest in order to grow.
And with the competitive online marketing world and the fight for attention from travelers, diversification is the name of the game.
“88% of YouTube travel-related searches focus on destinations, attractions, points of interest or general travel ideas” (Google)
But advertising needs to be profitable too and you need to see an ROI as quickly as possible. Well, with the right strategy, approach and foundations, with YouTube Ads you can see huge ROI in as little as 1-3 months.
With so many travelers using mobile devices to research and plan their holidays and travels, and with attention spans becoming shorter, video is one, if not, the most engaging and powerful way to inspire your potential customers, turning them from ‘lookers into bookers’ in the moments that matter to them, on the devices that they’re using; desktop, mobile or tablet.
If you’re not using video as part of your advertising strategy, you’re missing out.
According to Cisco, in 2019, video will account for 80% of internet traffic throughout the year.
So, with all that being said, here’s What We’re Going To Cover In This YouTube Ads Ultimate Guide:
- Why YouTube Ads are an amazing opportunity for Travel Brands
- The incredible targeting options available with YouTube Ads and how to use them to reach travelers at the different ‘Micro-Moments’ along their ‘Path To Purchase’
- The different YouTube Ads formats, when to use them, specs and requirement
- How To Setup Your First YouTube Ads Campaign
- The ‘Secret Sauce’ to running profitable YouTube Ads Campaigns
About the author

This is a guest contribution by Matt Holmes. Based in the UK, Matt is the founder of Visual8 Digital, a specialist YouTube Ads Agency for Travel Brands, producing and managing profitable, ROI-Focused YouTube Ads Campaigns, that tell inspirational stories and drive direct online bookings.
When he’s not filming, editing, running YouTube Ads Campaigns, you can find him in the gym, out walking with his wife and 2 whippets (dogs), or traveling around the UK, Europe or further afield – and yes, the camera goes with him on his travels!
Why YouTube Ads Are An Amazing Opportunity For Travel Brands
With a huge audience of travelers and holidaymakers using YouTube, and 88% of travel-related searches on the platform relating to destinations, attractions, points of interest and general travel ideas, the opportunity to position your Travel Brand in front of your ideal customers, has never been more exciting.
There are also over 2 billion monthly active users on YouTube, which is right on the heels of Facebook’s 2.3 billion. But the biggest difference between these 2 online giants, is that the average user stays on YouTube for over 40 minutes at a time (this is known as ‘session time’), compared to Facebook’s average of 20 minutes per day.
And with so many Travel Brands using Facebook Ads and Google Ads to advertise, why should you, as a Travel Brand, use YouTube Ads? Well, here’s 3 reasons (but trust me, there’s plenty more where these came from!):
- Reach your ideal customers based on their intent
- Incredible targeting opportunities
- Unsaturated, cost-effective advertising platform
When people go to Facebook, they go there to catch up with friends and family, perhaps post a few pictures of their day and generally, just kill a bit of time. They don’t really go to Facebook for a specific purpose.
But with YouTube, it’s a whole different ball game.
The reason being, that people go to YouTube with an INTENT. They generally go to YouTube to:
- Learn Something
- Do Something
- Buy Something
And when you advertise on YouTube with YouTube Ads, you can target people based on their INTENT.
Google owns YouTube, so as an advertiser, you have access to the data that Google knows about its users.
Now, when I say Google has got data on its users, I don’t mean personal details like name and address (although they do know that sort of information for people who have a Google account of some sort; but this information isn’t accessible to advertisers).
No, what I mean about the data that Google has on its users that is available to us as advertisers, are details such as:
- Websites they’ve visited
- What they’ve searched for on Google and YouTube (keywords/search terms)
- Videos they’ve watched and engaged with on YouTube
- What they’re ‘in the market’ for – in other words, Google knows when someone is seriously considering making a purchase
- What sort of topics they’re interested in – for example, ‘hotels in Paris’, ‘car hire in Rome’, ‘holidays in Australia’
- Places they’ve visited (using Google Maps data)
- Apps they have installed on their Smartphones
And, as we’ll cover next in this Ultimate Guide, you can actually choose to show your YouTube Ads on specific YouTube videos and Channels, which is something unheard of in the realm of online advertising, to be able to be that granular with your targeting.
The Incredible Targeting Available With YouTube Ads
YouTube have really taken their advertising targeting to the extreme; particularly when combined with the data that Google (YouTube’s owners!) have on its users. This gives advertisers a huge advantage when creating YouTube Ads Campaigns, as we can pinpoint exactly who we want to show our YouTube Ads to and reduce our wasted ad spend by not showing our ads to people who are never going to become customers.
So let’s now take a look at some of these incredible targeting opportunities:
Target People Based on Their Location
Location can be a critical targeting option for Travel Brands, especially if you offer experiences or activities to people who are in or around your destination.
With YouTube Ads, there are 3 high-level location targeting options available to you:
- All Countries and Territories (targets every country on Earth!)
- The Country You’re Based (I’m in the UK, so it’s showing ‘United Kingdom)
- Enter Another Location

However, we can drill down much further than this…
If you click on ‘Advanced Search’ next to the ‘Enter a location to target or exclude’ box, you’ll see more options become available.
The first one is Location, which allows you to add multiple locations of where you want your YouTube Ads to show, for example, ‘London’.

But the option I love is Radius. As this allows you to add 1 or more locations (as a place name, address, postcode, or coordinates) and choose a radius around that specific point on the map.
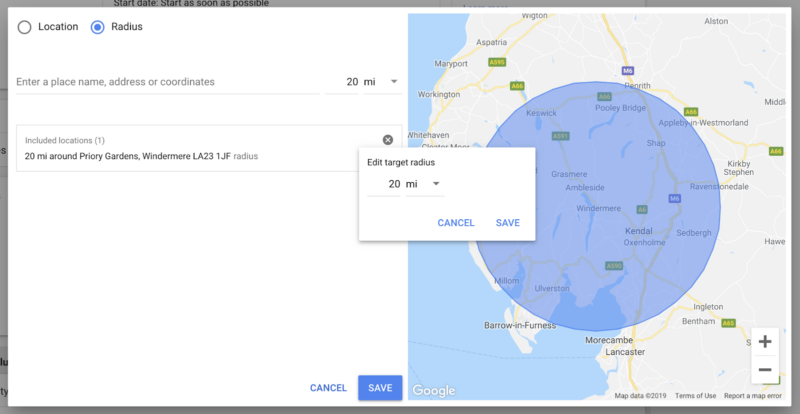
So if you only want to target people in or around a 20-mile radius of your location, you can do that with the location targeting of YouTube Ads!
And you can Exclude people in certain locations from seeing your YouTube Ads if you need to, by just typing the location into the ‘Enter a location to target or exclude’ box and clicking ‘Exclude’.

Target Individual YouTube Videos and YouTube Channels
Yep, you can actually copy and paste the URL of specific YouTube videos or channels into your YouTube Ads Campaign, that you want to show your ads on. This is known as ‘Placement Targeting’.
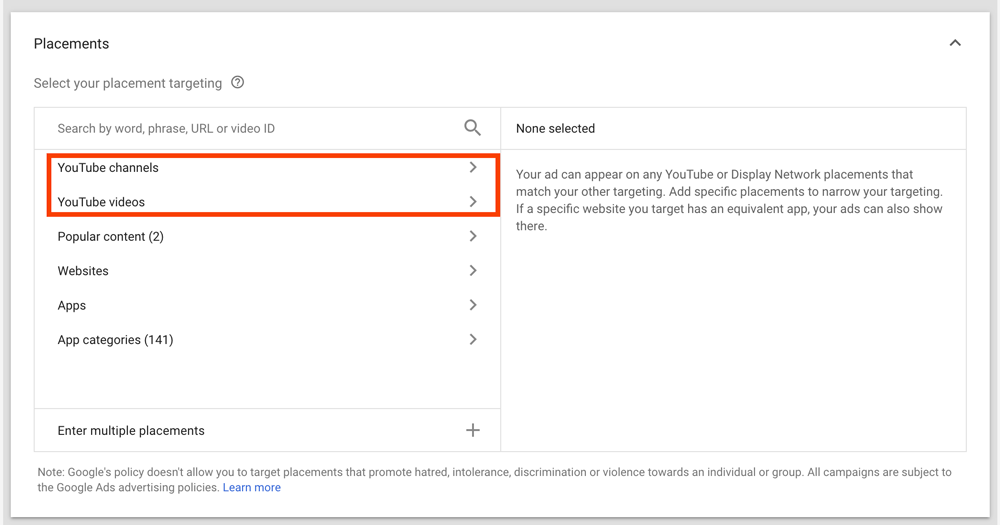
IMPORTANT
Just make sure that the channels and videos you’re selecting for placements are ‘monetized’, which simply means that the YouTube Channel owner has agreed to allow ads to play before their videos. You can see which YouTube Channels are ‘monetized’ by looking for the little yellow spots in the play-bar on YouTube Videos, as shown in the image below.

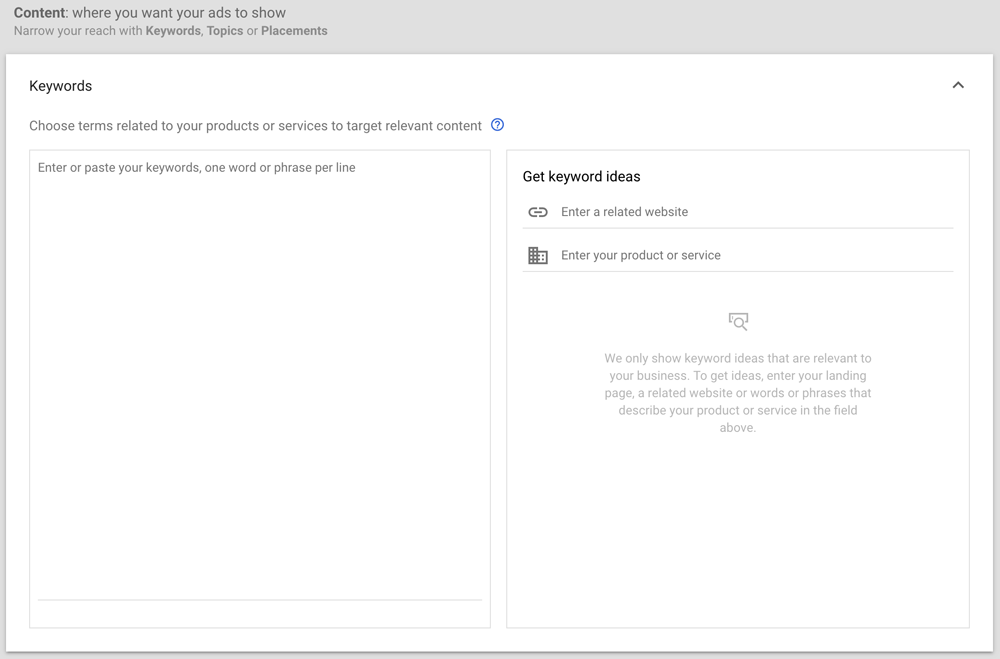
Target People With Keywords
Another targeting option, which is similar to Placement targeting (above), is using Keywords.
These are the keywords that relate to particular content someone is watching on YouTube. When a YouTube Creator uploads a video to their Channel, they write a Title, Description and Tags, which essentially helps their videos be discovered organically on YouTube and Google.
So when you target your YouTube Ads using keywords, YouTube is looking at words within the Title, Description and Tags that the YouTube Creator has added to their video.
Now you might be thinking that this is almost exactly the same as placement targeting! And it is very similar!
But the difference with keyword targeting is that you add say 50 keywords, and the YouTube algorithm will go and find all the videos that have those keywords associated with them, rather than you individually copying and pasting individual video URLs, which can take a lot of time.
One thing to be aware of, however, with using Keywords targeting, is that you’re relying on the YouTube Creators to use words within their Title, Description and Tags, that are actually relevant to their video content. If they’re adding keywords that are completely irrelevant to their videos but are relevant to your YouTube Ads, then your ads could show on videos that don’t align with your brand or message.
Target People With Topics
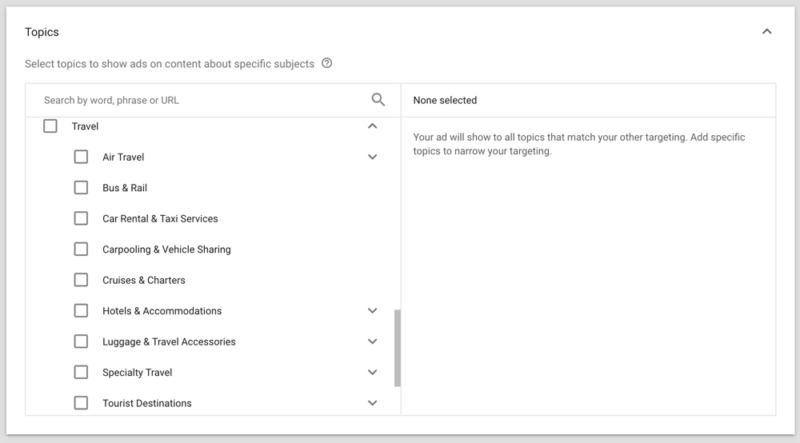
Similar to Keyword Targeting, Topic Targeting uses topics that YouTube Creators have selected when they’re uploading their videos. But as with Keyword Targeting, Topic Targeting relies heavily on YouTube Creators selecting the right topics, from a predetermined list of topics for their Channel. But it’s definitely an option to test, even with just a small budget behind it initially.
Target People Based on Their Google Search History
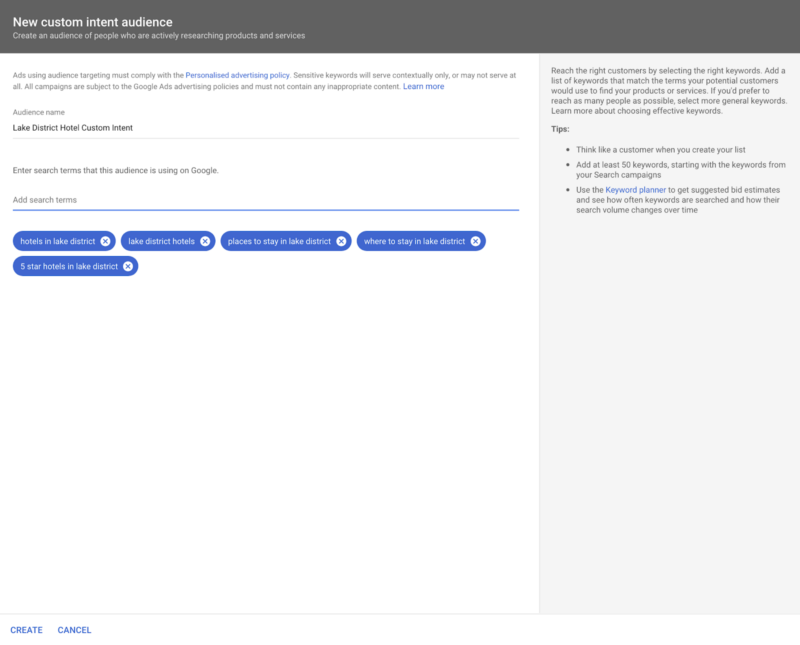
This is unique in the online advertising space! Using Google’s data, you can show your YouTube Ads to people based on what they’ve searched for on Google’s Search Engine that we know and love. This is known as a ‘Custom Intent’ audience.
For example, if you own an activity center in the Lake District, you could show your YouTube Ad to people when they’re on YouTube who have recently searched for keywords such as “kids activities in the lake district” on Google! I’m sure you’ll agree, that that’s pretty powerful!
To create a Custom Intent audience, the best place to start is by looking at your Google Analytics and Google Search Console accounts to see the keywords that have been typed into Google that bring up your website in the Google Search Results.
And if you run Google Search Ads, you could even use the same keywords you use in these campaigns in your YouTube Ads Custom Intent Audiences.
For best results, try and build a list of at least 50 keywords for your Custom Intent Audiences. You might think this sounds like a lot, but with tools such as Google Analytics, Google Search Console and Google Ads Keyword Planner, you’ll soon blast past 50 keywords!
Target People Based on Their Purchase Intent (According to Google)
Google has an amazing targeting option known as ‘In-Market’. Using the incredible amount of data that Google knows about its users, based on an individual’s online behavior (Google search history, the intent behind the keywords they’ve searched for on Google and YouTube, websites they’ve visited, etc.) Google makes a great prediction as to whether someone is actively looking to make a purchase. And you as a Travel Brand can use these audiences to show your YouTube Ads to.
In-Market Audiences are similar to Custom-Intent Audiences (described above) but are grouped into predefined groups. For example, some of the In-Market Audiences available to you are:
- Air Travel
- Car Hire
- Trips By Destination
- Cruises
- Hotels and Accommodation
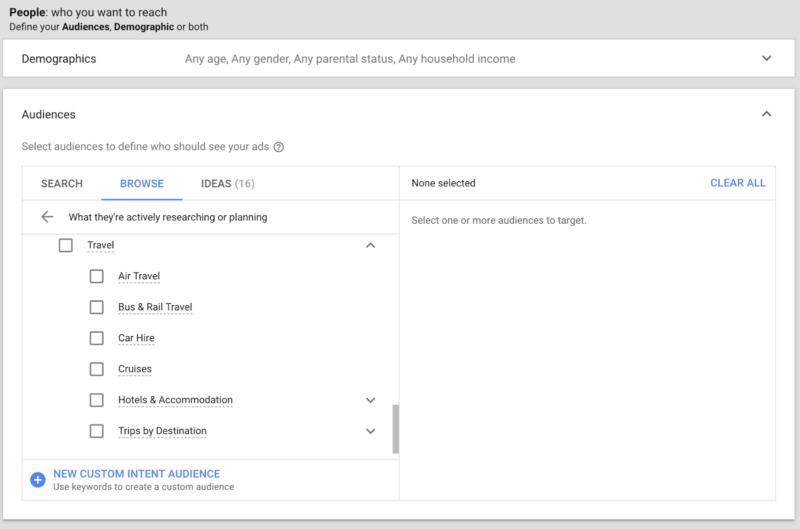
These are just a few of the many In-Market Audiences available; overtime, Google are constantly adding more and more to this list.
When thinking about whether to run Custom-Intent Targeting Campaigns or In-Market Targeting Campaigns, we always run both!
You don’t know what works unless you test! So by testing In-Market against Custom Intent, you’ll be able to see if one outperforms the other dramatically. And you can always turn the worse-performing targeting option off and scale the winning targeting option.
This is one of the many advantages of YouTube Ads! You can quickly and easily scrap the losers and scale the winners.
Target People Based on Their Demographics
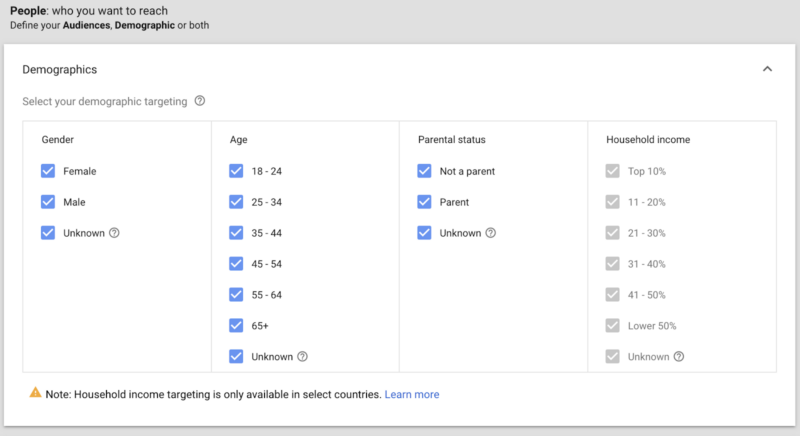
Demographics is something that is common across all online advertising platforms; but it’s good to know that you’ve got access to demographic targeting with YouTube Ads, which includes:
- Gender
- Age
- Parental Status
- Household Income (only available in certain countries)
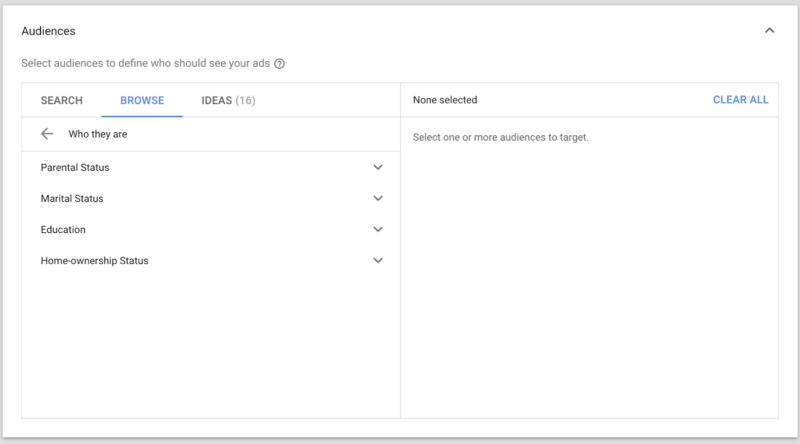
You can also target people using ‘Detailed Demographics’, which includes options such as:
- More detailed Parental Status (e.g. parents of infants, parents of toddlers, parents of teens, etc.)
- Marital Status (single, in a relationship, status)
- Education (e.g. current University students)
- Home Ownership Status (homeowners or renters)
Target People Based on Their Interests and Habits
Over time, Google builds up an accurate profile of its users. So from the websites that they visit, the keywords they search for and their overall online behavior, they often know more about their users than the users themselves do!
And you can show your YouTube Ads to people based on the data that Google knows about the interests and habits of its users.
This audience type is known as an ‘Affinity Audience’.
Typically, targeting interests and habits is more of an upper funnel strategy, than a lower funnel, because they aren’t currently showing signs of being in a position to make a booking.
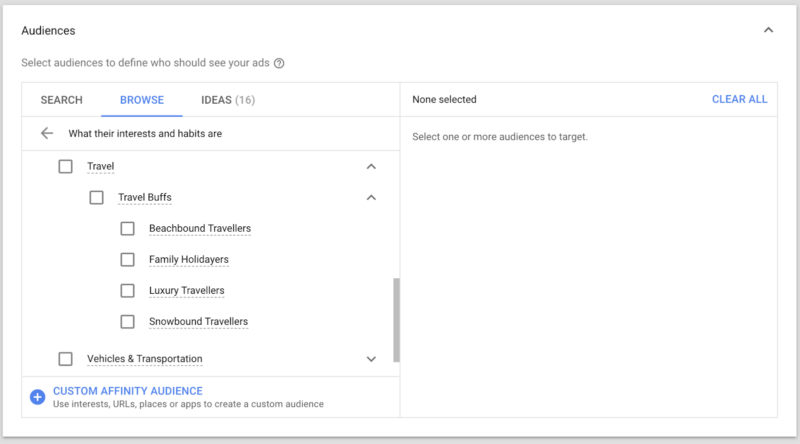
The predefined Affinity Audiences available with YouTube Ads specifically for Travel Brands are pretty limited, as you can see from the screenshot below.
But all is not lost with Affinity Audiences…
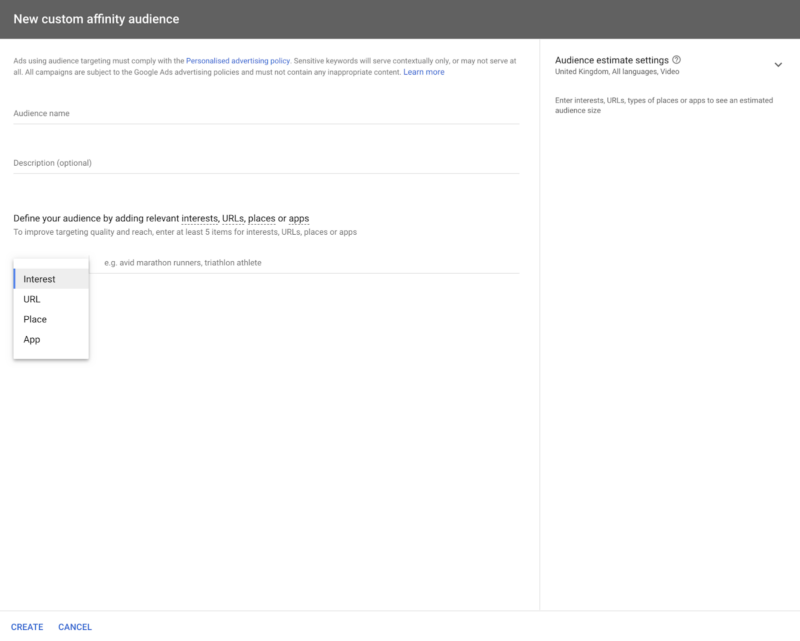
We tend to use ‘Custom Affinity’ audiences, which allow for much more granular targeting, as you can target people based on:
- Interests (e.g. hobbies, products, activities, etc.)
- URL’s (the websites people visit)
- Places (using Google Maps data)
- Apps (installed on an individual’s phone)
For best results with Custom Affinity Audiences, try and add at least 5 items total. You don’t need to enter something for each of the 4 options (Interests, URL’s, Places, Apps).
For example, if you’re running YouTube Ads for a cruise line, you could create a Custom Affinity Audience if you know that your ideal customers look online for subjects such as:
- Different locations for cruises
- Reviews of different cruise lines
- Cruising holiday deals
Custom Affinity Audiences can perform really well, but they take some time to refine and get them delivering great results for you.
So we tend to create Custom Affinity Audiences once we’ve gathered some data from other types of targeting options about the type of websites, interests, etc. that are relevant to people who are resonating with our other YouTube Ads have.
Target People Who Are Already Aware of Your Travel Brand
As with other online advertising platforms, with YouTube Ads, you can create Ad Campaigns that only target a warm audience; meaning that they are already aware of your brand.
So, perhaps they’ve visited your website, made an inquiry, watched one or more of your YouTube videos, or they may have even been a customer of yours in the past.
This type of targeting is known as ‘Remarketing’. And it tends to be less expensive to run Remarketing Campaigns, because you’re not going after a cold audience.
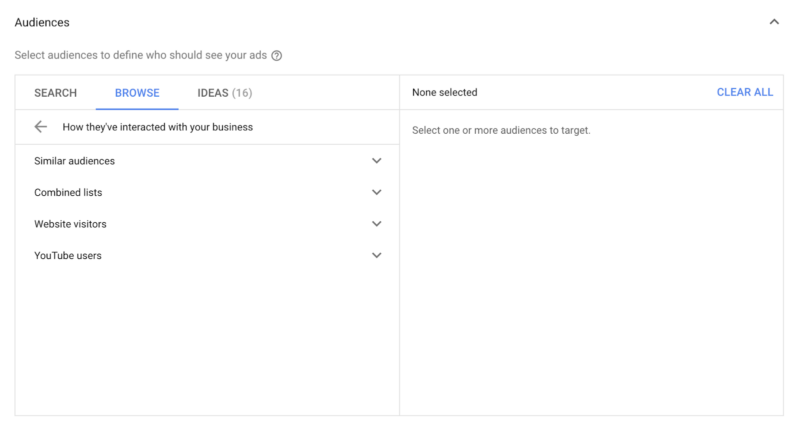
Another powerful type of Remarketing Audience is ‘Similar Audiences’. These are audiences that Google build for you based on other Remarketing Audiences of yours.
For example, let’s say you had a Website Visitors Remarketing Audience, Google would create a Similar Audience of thousands, even tens of thousands or more, of people who have similar interests, online behavior, etc.
As you can see, these are very powerful audiences and can produce amazing results!
Google says that you need a minimum Remarketing Audience list size of 100 people to create a Similar Audience list from.
However, we find that a Remarketing Audience list size of 1000 people produces much better results. So, if you can build a Website Visitors Remarketing Audience list of 1000 people, for example, Google will be able to build a strong Similar Audience list from this. But the bigger the better!
Just bear in mind that it can take 48-72 hours for Google to create your Similar Audience list.
What Targeting to Use and When
So that’s an overview of the incredible targeting options available with YouTube Ads. But how and when should you use each of them to target travelers along their ‘Path To Purchase’? That’s what we’ll cover right now!
Rarely do we use one type of targeting for a client. To get the most out of YouTube Ads, I highly, highly recommend that you use multiple targeting strategies and test which ones deliver the best results for your Travel Brand.
Travelers go through their own ‘Path To Purchase’ when thinking about, booking and experiencing their holiday or trip. And within this journey, there are 4 main ‘Micro-Moments’:
 |
 |
 |
 |
So based on these Micro-Moments, let’s see how we would use the targeting available to us with YouTube Ads to reach travelers at each one.
Bear in mind that although we use some of the same targeting options at different Micro Moments, the YouTube Ads themselves (i.e. the video content within the ads) will be different.
To put some context into this, let’s use an example of a guided tours company in the Lake District who are running a YouTube Ads Campaign.
Micro-Moment 1 – I Want to Get Away – Dreaming Moments
YouTube Videos and Channels (Placements)
If travelers are in Micro Moment 1, they’re dreaming about getting away on holiday. So by showing your YouTube Ads on specific videos related to your destination is a great way to introduce travelers to your Travel Brand
Keywords
Similar to Placements targeting, now we’re giving YouTube a list of keywords related to the content that we want our YouTube Ads to show on. But rather than finding the videos manually ourselves, we’re letting YouTube do the hard work and go and find the videos that have specific keywords in the Titles, Descriptions and Tags of videos across YouTube.
Interests (Custom-Affinity)
As I mentioned earlier in this guide, we tend not to use Affinity Audiences because the options are pretty limited for Travel Brands. Instead, we use Custom Affinity Audiences. So, we create a Custom Affinity Audience with a collection of Interests, URLs and Places typically. We tend to leave the ‘Apps’ option alone – but we’re always testing!
Remarketing
If people have previously visited your website it’s worth keeping your Travel Brand front-of-mind as early as possible in their Path To Purchase.
It’s also a good idea to remind previous customers of your brand, so if you have a database of email addresses that you have permission to use, you can upload these email addresses to create a Remarketing Audience of past customers to show specific YouTube Ads to.
Lake District Guided Tours Example
I don’t want to make this guide too long, so I won’t list every single specific targeting option below! But I’ll show you a selection of where we’d start our targeting. Over time, we would, of course, refine this targeting as we start to see the winners and the losers.
YouTube Video and Channels (Placements)
Keywords
- Lake District
- North England
- Windermere
- Cumbria
- Things To Do In Lake District
Interests (Custom-Affinity)
- Interests:
- Walking
- Hiking
- Dog Walking
- Lake District
- URLs:
- NationalTrust.org.uk
- Lakedistrict.gov.uk
- GoLakes.co.uk
- VisitCumbria.com
- Places:
- Hotels
- Travel Accommodations
With this Custom Affinity Campaign, we would also use Location Targeting, as we don’t want to show our Guided Tours YouTube Ad to people outside of the UK who have an interest in ‘Walking, for example, as they may never have any intention to visit the UK!
Remarketing
- Website Visitors, broken down into separate audience lists:
- Visited website in past 7 days
- Visited website in past 14 days
- Visited website in past 30 days
- Visited website in past 60 days
- Visited website in past 90 days
- Customer List (previous customers)
Micro-Moment 2 – I Want This Trip To Be Perfect – Planning Moments
Custom Intent Audience
When travelers are planning their holiday, they tend to search for particular things on Google relating to planning. So create a list of keywords that are relevant for the planning stages of a holiday that relate to your Travel Brand in some way, such as things to do in your local area, local landmarks, etc.
Affinity Audience
As I mentioned earlier, we don’t tend to use Affinity Audiences, but we do like to test it now and again just to see if their audiences have improved – we won’t know unless we test it out!
Remarketing
It’s always worth reminding travelers of your brand throughout their Path To Purchase, which why we include Remarketing Audiences in every Micro Moment. But we would show these audiences an alternative YouTube Ad.
Lake District Guided Tours Example
Custom Intent Audience Keywords
- Places to stay in Lake District
- Hotels in Lake District
- Things to do in Lake District
- Places to visit in Cumbria
The reason I’ve included keywords about hotels, is that people looking for hotels in the Lake District will at some point be looking for things to do whilst on holiday. So even though they might not necessarily be looking for things to do on holiday right now, introducing people to your Travel Brand this early on in the Path To Purchase can work really well.
Affinity Audience
- Lifestyles & Hobbies > Outdoor Enthusiasts
Remarketing
- Website Visitors, broken down into separate audience lists:
- Visited website in past 7 days
- Visited website in past 14 days
- Visited website in past 30 days
- Visited website in past 60 days
- Visited website in past 90 days
- Customer List (previous customers)
Micro-Moment 3 – I’m Ready To Book It – Booking Moments
Custom Intent Audience
As in Micro Moment 2, we’ll use Custom Intent Audiences again, but this time using keywords that show someone is looking to book their holiday.
In-Market Audience
As I mentioned earlier in this guide, it’s worth testing Custom Intent Audiences against Google’s In-Market Audiences, choosing predefined audiences that relate to your Travel Brand.
Remarketing
Similar to remarketing in Micro Moment 1, we would show a different YouTube Ad to people who have previously visited our website, perhaps with a special offer, as well as another ad to previous customers.
Lake District Guided Tours Example
Custom Intent Audience Keywords
- Lake District Guided Tours Offers
- Lake District Guide Tours Prices
- Lake District Tours Special Offers
- Lake District Tours Deals
In-Market Audience
- Trips To The UK
- Hotels and Accommodation
Again, I’ve selected In-Market Audiences relating to Hotels, because these people are ready to book and will be looking for things to do on holiday very soon after booking.
Remarketing
- Website Visitors, broken down into separate audience lists:
- Visited website in past 7 days
- Visited website in past 14 days
- Visited website in past 30 days
- Visited website in past 60 days
- Visited website in past 90 days
- Customer List (previous customers)
Micro-Moment 4 – I Want To Make The Most Of It – Experiencing Moments
Micro Moment 4 tends to be for Travel Brands who offer activities or experiences, such as whitewater rafting, helicopter rides, kayaking, restaurants, etc.
Location
As people are actually on holiday in this Micro Moment, we only want to target people who are within a reasonable distance from your location; people aren’t going to want to drive for hours for a day out! So, it’s best to use location targeting with a specific radius from your Travel Brands postcode.
Custom Intent
If there’s something specific that people search for whilst they’re on holiday that relates to your offering, then creating a Custom Intent Audience is a great way to target these travelers.
Remarketing
And as always, a Remarketing Campaign is always a good idea to run in Micro Moment 4, providing you offer an activity or experience. I wouldn’t recommend using Remarketing in this Micro Moment if your main offering is Accommodation such as hotels or self catering cottages for example.
Lake District Guided Tours Example
Location
- People within a 30-mile radius of the area(s) that the Guided Tours company cover
Custom Intent Keywords
- Guided Tours Lake District
- Lake District Tours
- [TOWN NAME] Guided Tours (e.g. Keswick Guided Tours)
Remarketing
- Website Visitors, broken down into separate audience lists:
- Visited website in past 7 days
- Visited website in past 14 days
- Visited website in past 30 days
- Visited website in past 60 days
- Visited website in past 90 days
- Customer List (previous customers)
- People who have seen previous YouTube Ads from this Guided Tours Company
Keeping up?!?! Great stuff, well done! Let’s keep moving and move onto the next section of this YouTube Ads Ultimate Guide, which is…
The Different Ad Formats on Offer with YouTube Ads
So with YouTube Ads, you have 4 main Ad Formats to choose from:
- Skippable In-Stream Ads
- Unskippable In-Stream Ads
- Bumper Ads
- Video Discovery Ads
Each Ad Format has its own characteristics, benefits, strengths and weaknesses. So each come into their own at the different Micro Moments along the Path To Purchase.
 |
 |
 |
 |
So, let’s go through each of these 4 YouTube Ads Formats…
Skippable In-Stream Ads
These are the ads that play before monetized videos on YouTube that, as a viewer, you can skip after 5 seconds. These ads are also known as ‘TrueView’ Ads, because you, as the advertiser, only get charged when some watches the Ad for at least 30 seconds, or the full duration of the ad, if it’s shorter than 30 seconds.
This is very different than Facebook Ads, where you’re charged for every impression. Or Facebook Video Ads, when you’re charged when somebody watches just 3 seconds of your Ad.
And you can also add 1 or more ‘Calls-To-Action’ (CTA) to your ad, as highlighted in the image below.
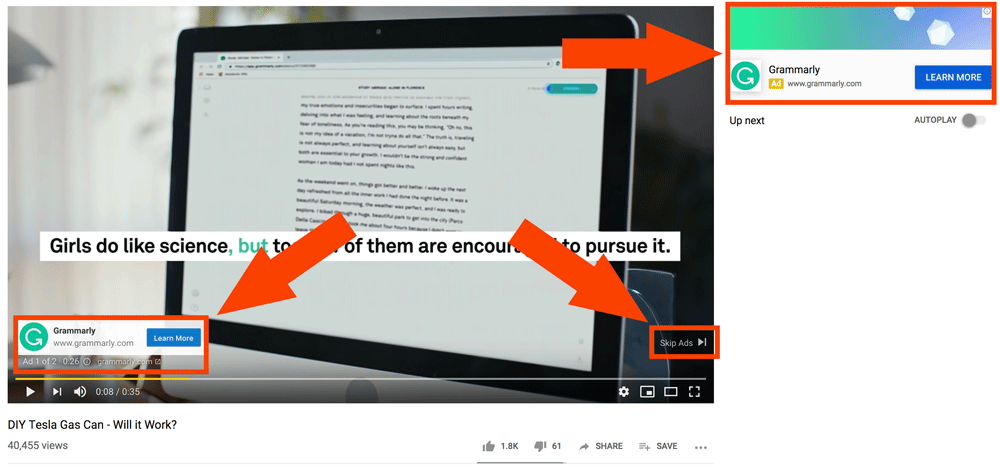
As people can ‘skip’ these In-Stream Ads after the first 5 seconds, you really need to make these first 5 seconds of your ad extremely engaging and captivating, to encourage them to keep watching.
However, you also want to repel the wrong people from watching your ad, as you only want to pay for views of your ad by people who have got a good chance of becoming a customer further down the line.
But if you know your ideal customer well, you’ll be able to reduce wasted ad spend considerably when you set up your targeting.
Skippable In-Stream Ad Requirements
- Duration: 12secs (minimum) – 3 minutes (maximum)
- Where They Appear: Before, during and after ‘monetized’ YouTube videos
- Call-To-Action Button: 10 Characters (maximum)
- Companion Banner (displayed on right-hand side of video): Auto-Generated from video or Custom Design 300 x 60 (pixels)
- When You’re Charged: At 30 seconds (full duration if shorter than 30 seconds), or when Call-To-Action is clicked
Unskippable In-Stream Ads
Again, these are the ads that play before monetized videos on YouTube, but the difference is that they can’t be skipped after 5 seconds. Viewers have to watch the entire ad before they can watch the video that they came to watch in the first place.
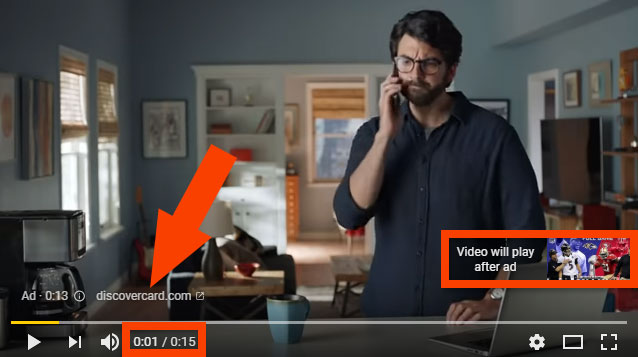
So, understandably, these ads are the least liked by YouTube users. You also can’t add a Call-To-Action button. The only way that people can actually take action from the ad and visit your website, is to click on the small website address text in the bottom left hand corner of the video (shown in the image below), or through a Companion Banner, as with the ‘Skippable In-Stream Ads’.
Unskippable In-Stream Ad Requirements
- Duration: 7 secs (minimum) – 15secs (maximum)
- Where They Appear: Before, during and after ‘monetized’ YouTube videos
- Call-To-Action Button: None (apart from website URL in the bottom left of the video)
- Companion Banner (displayed on right hand side of video): Auto Generated from video or Custom Design 300 x 60 (pixels)
- When You’re Charged: Per 1000 impressions (CPM)
Bumper Ads
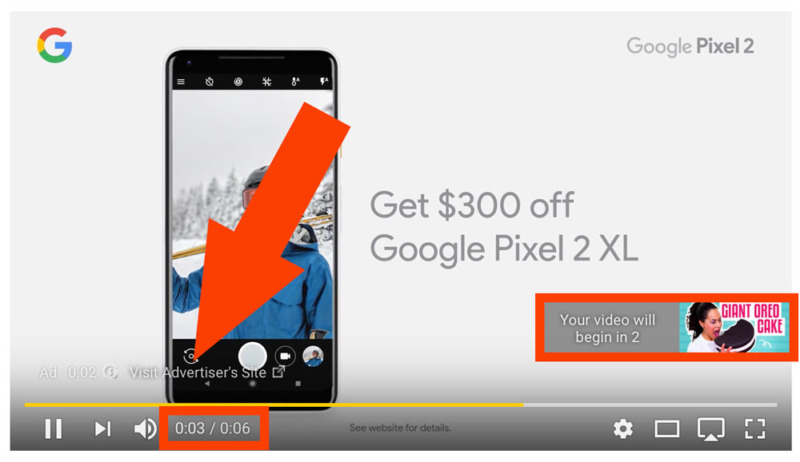
Best used for brand awareness, Bumper Ads are 6 second (maximum) video ads that play before monetized videos on YouTube. They don’t have any Call-To-Action aside from a Companion Banner and the on-screen website URL of the advertiser.
As I mentioned above, Bumper Ads perform best when used for Brand Awareness and keeping your Travel Brand front-of-mind for your potential customers. So we tend to use Bumper Ads as part of a larger YouTube Ads campaign strategy.
Bumper Ads Requirements
- Duration: Up to 6 secs (maximum)
- Where They Appear: Before, during and after ‘monetized’ YouTube videos
- Call-To-Action Button: None (apart from website URL in the bottom left of the video)
- Companion Banner (displayed on right hand side of video): Auto Generated from video or Custom Design 300 x 60 (pixels)
- When You’re Charged: Per 1000 impressions (CPM)
Video Discovery Ads
Video Discovery Ads are slightly different to all the other ad formats we’ve been through so far, because typically, these are more ‘Content’ videos (videos with titles such as, “how to market my tours company”, “how to generate more direct bookings”, etc.), that you put some money behind to ‘push’ them in front of your ideal customers, rather than wait for the YouTube algorithm to rank your videos based on various different factors, such as title, description, tags, engagement, etc., which is the route that the majority of YouTube Creators take.
When setting up a Video Discovery Ads campaign, you still have access to all the targeting tools that we’ve discussed in this guide.
So Video Discovery Ads can appear in a number of different places across the YouTube platform:
- YouTube App Feed (Mobile Only)
- YouTube Search Results (as highlighted in the image below)
- Suggested Videos (videos down the right hand side on a video watch page)
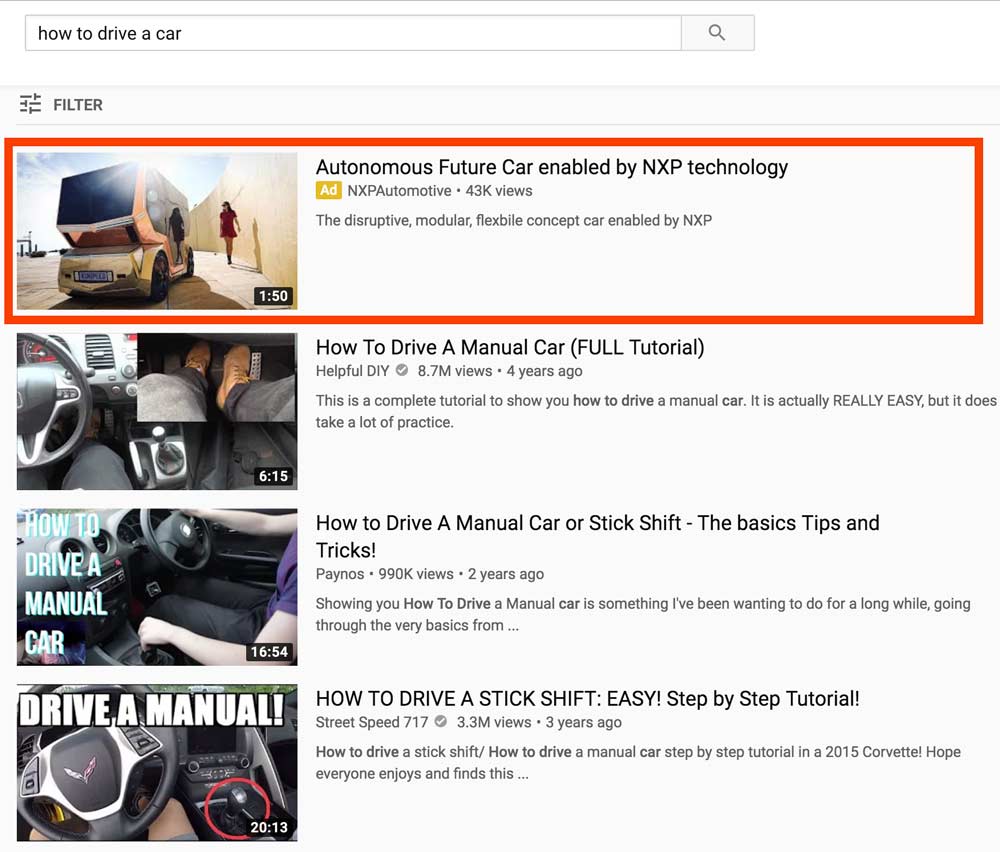
There are a few things to bear in mind with Video Discovery Ads, that make them slightly different from all the other Ad Formats that we’ve discussed in this guide so far, the main one being that you are charged when someone actually clicks on your Video Discovery Ad from any of the places listed above. You are NOT charged for impressions.
Video Discovery Ads Requirements:
- Duration: Minimum of 12 seconds (no maximum)
- Where They Appear: YouTube App Feed, Search Results and Suggested Videos
- Call-To-Action Button: None
- Companion Banner: None
- When You’re Charged: Per Click (CPC)
Wow! Got all that? Still here? Great! Let’s move onto actually setting up your first YouTube Ads Campaign. Exciting!
How To Setup Your First YouTube Ads Campaign
The first thing you’ll need to do to set up a YouTube Ads Campaign is to create a Google Ads Account if you don’t already have one.
If you do have one, cool, move on. If not, head on over to https://ads.google.com and just follow the on-screen instructions to get everything in place.
You’ll also need a YouTube Channel setup in order to run YouTube Ads. If you already have a Youtube Channel for your business, just double check that it’s setup as a ‘Brand Account‘, rather than a personal account, as this will allow you a few more options than a personal account, such as multiple managers, but you’ll still be able to access a Brand Account through your personal account/channel.
If you don’t have a YouTube Channel, just head on over to YouTube.com and because you’ve already setup a Google Ads Account, you’ll be able to use the same login details to create your new Youtube Channel.
All sorted? Great, let’s move on…
Linking Your Google Ads Account and Your YouTube Channel
This is a crucial step to really get the most out of YouTube Ads, as you’ll be able to access so many more targeting, measurement and analytics tools, than if you don’t link your Google Ads Account and YouTube Channel together.
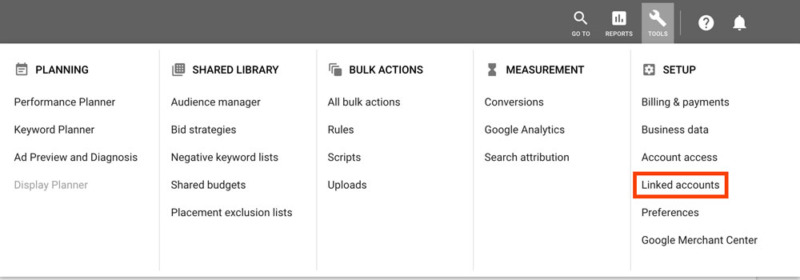
To do this, once you’re inside your Google Ads Account, head on up to the spanner/wrench icon in the menu bar at the top right of your screen and click ‘Linked Accounts‘ (as shown in the image below).
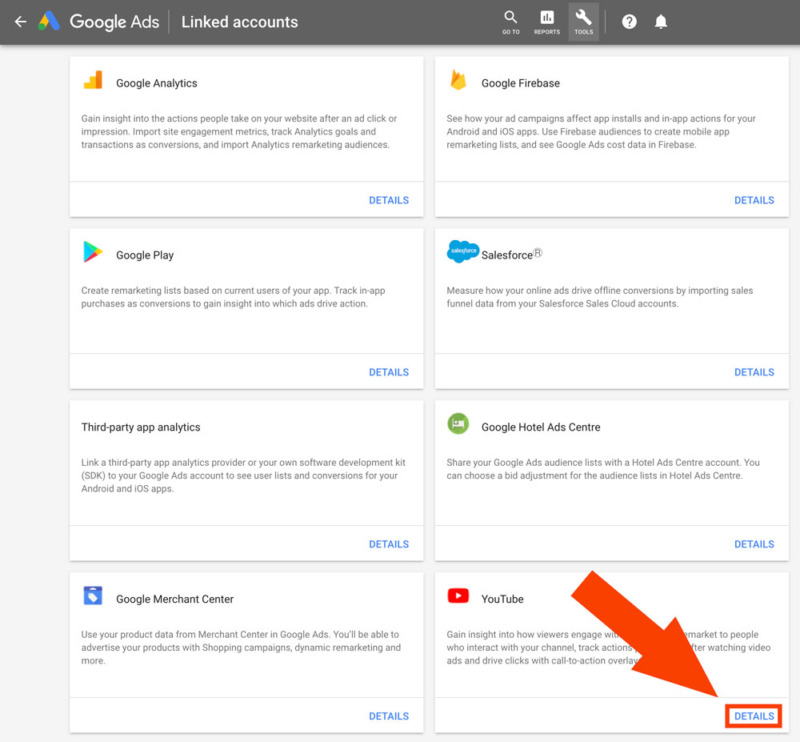
On the next screen, scroll down till you see the ‘YouTube’ section and click on ‘Details’ (as shown below)
Now click on the ‘Add Channel’ button.
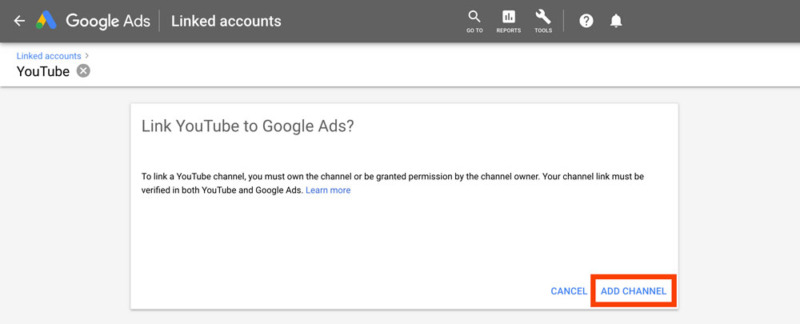
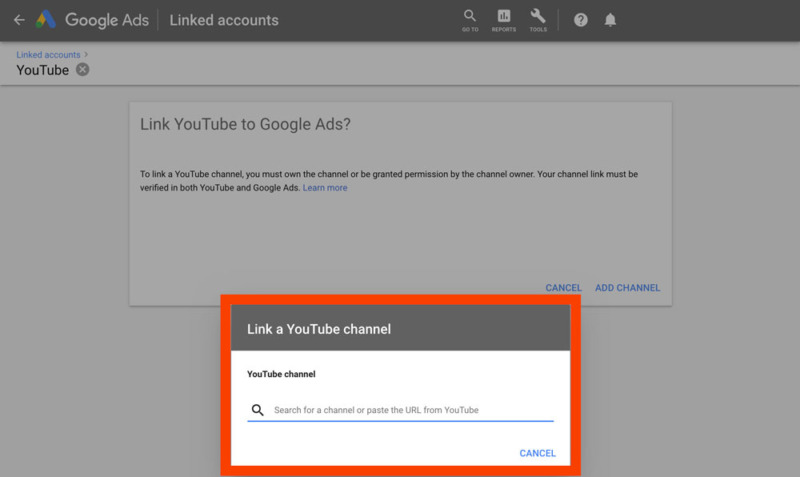
Then either type your YouTube Channel name into the box that pops up (as shown below), or copy and paste your Youtube Channel URL.
Once you’ve searched for your Channel or copy and pasted the URL, select from the appropriate channel ownership options and then click ‘Go To YouTube’, to finish off the linking process.
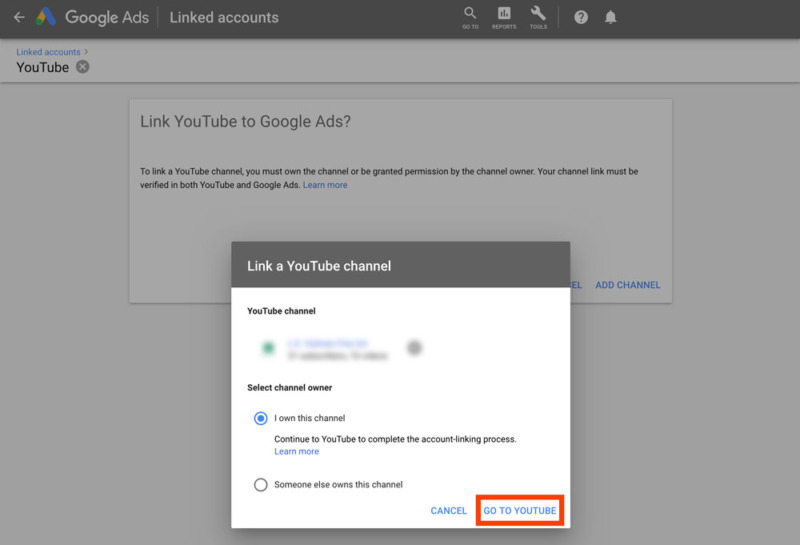
IMPORTANT
To finish the linking process between your Google Ads Account and YouTube Channel, you’ll need to be logged into the required YouTube Channel on the same internet browser.
When you see the box below, just give the link a name, make sure all 3 options are ticked from the selection of ‘View Counts’, ‘Remarketing’ and ‘Engagement’ and then click the ‘Link’ button.
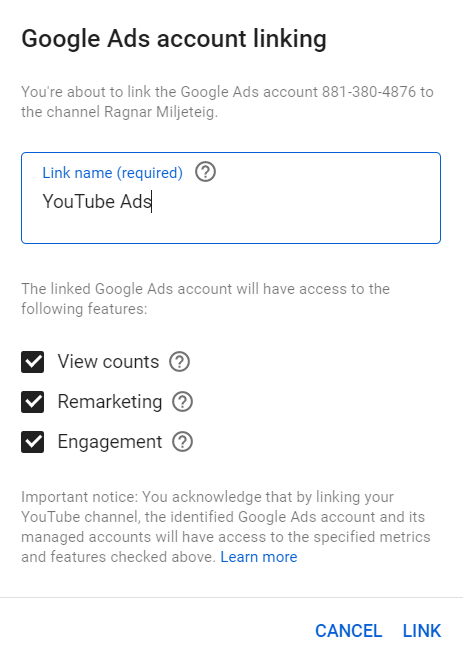
And you’re all set; ready to launch your first YouTube Ads Campaign, which we’ll dive into right now!
Campaign Structure
Before we jump into the Google Ads platform again to build out your first YouTube Ads Campaign, I wanted to briefly cover the ‘Account Structure’ of your campaign. The diagram below gives you a high level, 30,000-foot view of how everything works and links together.
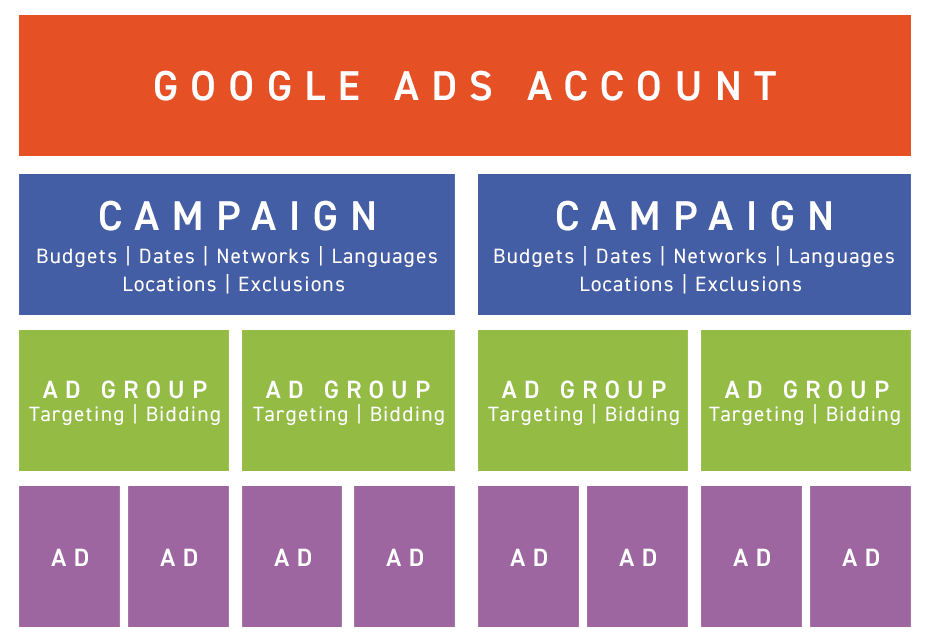
Based on the above diagram, the best advice I can give you when you’re thinking about your YouTube Ads Campaigns is this…
Use 1 Targeting Option Per Campaign
Don’t ‘layer’ lots of different targeting options on top of one another in one Campaign; especially when you’re just starting out.
When you set your YouTube Ads Account up this way, you’ll also be able to control the amount of budget per Campaign and therefore, per Targeting option, giving you a huge amount of control over how much you spend on your YouTube Ads, as you can see from the diagram below.
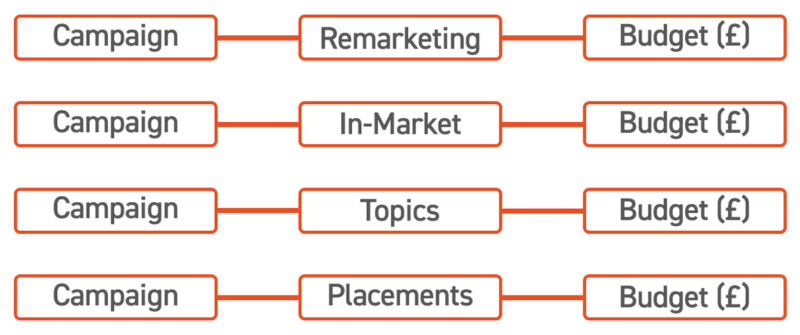
It can be tempting to add lots of targeting options into one Campaign. But if you do, then it’s very difficult to determine which targeting worked and which didn’t. Whereas, if you have just 1 targeting option per Campaign, you can quickly and easily see which targeting is working and which isn’t
Here’s a great quote/motto to remember when running YouTube Ads:
What gets measured, gets managed
Building Your Campaign in Google Ads
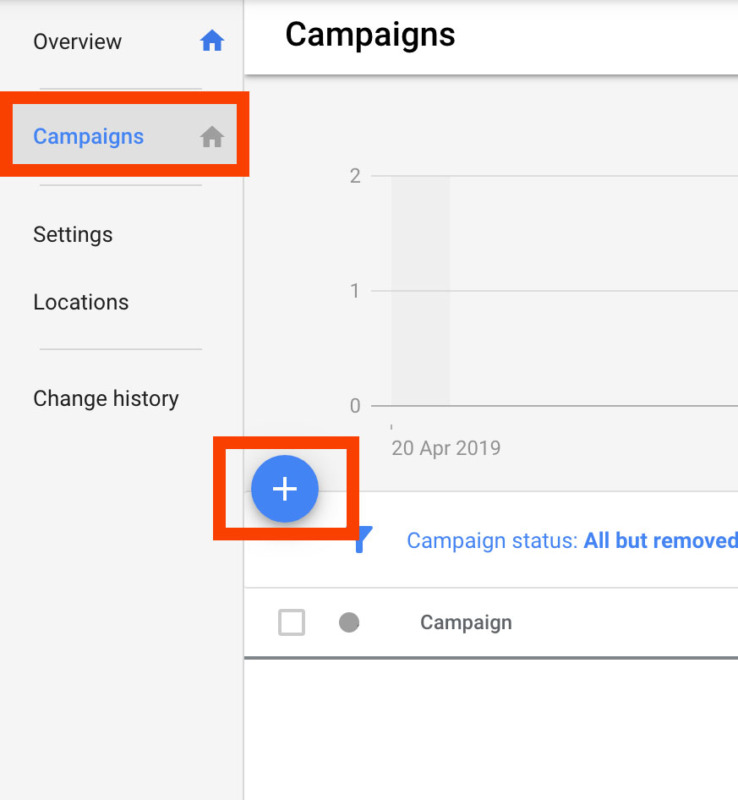
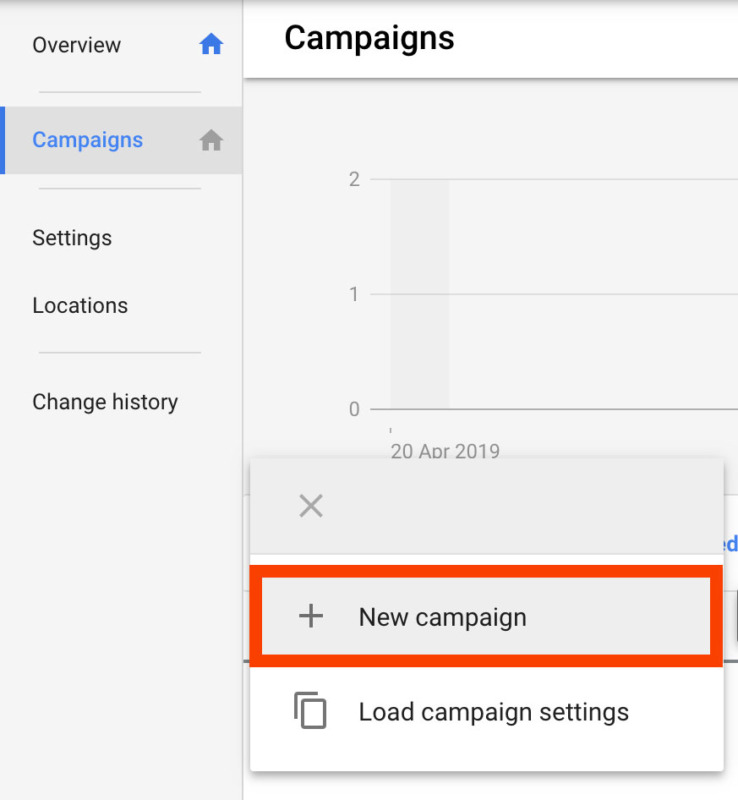
So, back on your Google Ads dashboard, to get started, click on the ‘Campaign’ option in the left hand menu, then click on the blue + button and choose ‘New Campaign’ from the menu that pops up.
 |
 |
Now choose an objective for your campaign by asking yourself, what do you want your campaign to achieve? You can choose from:
- Sales
- Leads
- Website Traffic
- Product and Brand Consideration
- Brand Awareness and Reach
- App Promotion
- Create a Campaign Without a Goal’s Guidance
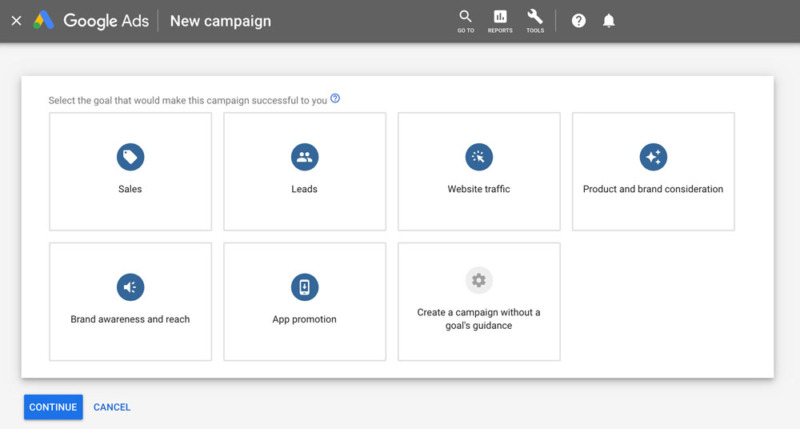
Once you’ve chosen your goal, you’ll need to choose a ‘Campaign Type’, which, for YouTube Ads, will need to be ‘Video’.
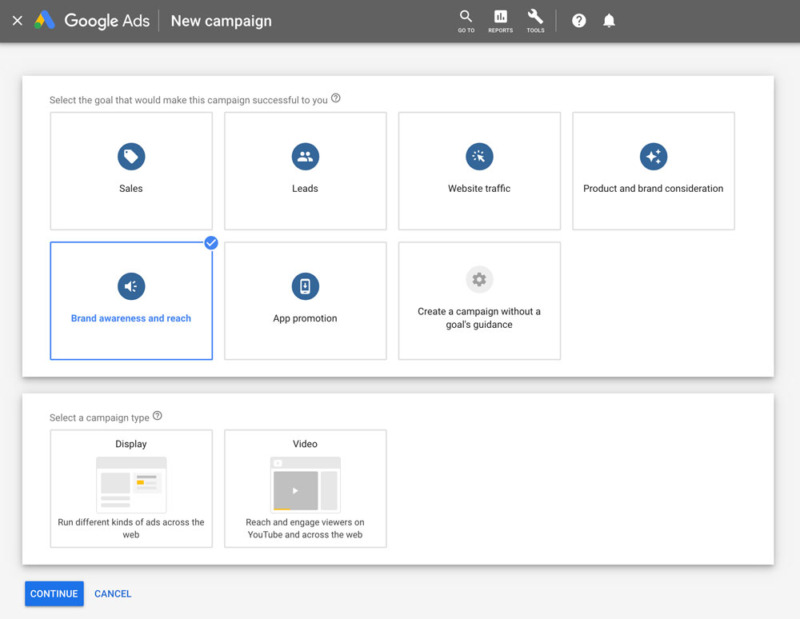
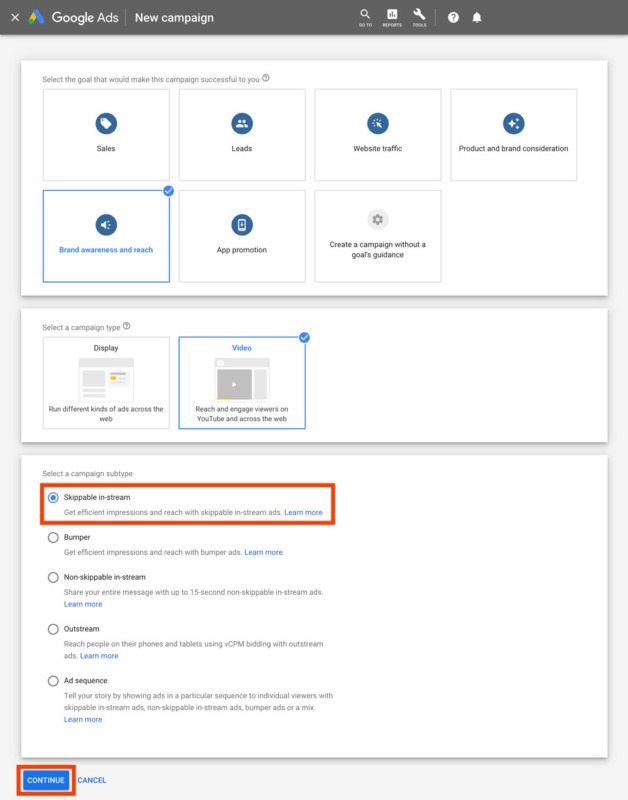
After choosing your goal and campaign type, you’ll need to select a ‘Campaign Sub-Type’, which will differ depending on the overall goal that you select. I’ve chosen ‘Brand Awareness and Reach’ for this example, which gives the option of the following:
- Skippable In-Stream
- Bumper
- Non-Skippable In-Stream
- Outstream
- Ad Sequence
You’ll most likely recognize some of the sub-goals from the Ad Formats section earlier in this guide! So for now, I’ll go ahead and choose ‘Skippable In-Stream’ and then click the blue ‘Continue’ button at the bottom of the screen.
Campaign Name
The next screen you arrive on might seem a bit daunting, but don’t worry, I’m going to walk you through everything you need to know about setting up your YouTube Ads Campaign the right way.
So, the first thing you’ll want to do is name your Campaign. There are many different naming conventions you could use to name your campaign, but I typically use something along the lines of the following:
[PLATFORM] | [GOAL] | [DEVICE]
In practice, to add some context to this with an example, the above naming convention could be:
YT | Enquiries | Desktop
With ‘YT’ standing for ‘YouTube’, because within the Google Ads platform, you may also be running Google Search Ads and/or Google Display Ads. So by adding ‘YT’ to the beginning of the Campaign Name, easily differentiates between the different Campaigns you may have running at any one time.

There’s no right or wrong way to name your Campaigns; just make sure that it’s something that is recognizable to you and that you can quickly and easily determine the purpose, context and goal of each campaign.
As with any paid advertising, there is a certain amount of testing and optimization required, so once you have more than 10 campaigns on the go, it’s going to be hard to see the wood for the trees if all your campaigns are named something irrelevant or complicated!
Budget
Once you’ve decided on your Campaign Name, the next section to work on is ‘Budget’.
You can choose between:
- Campaign Total
- Daily Budget
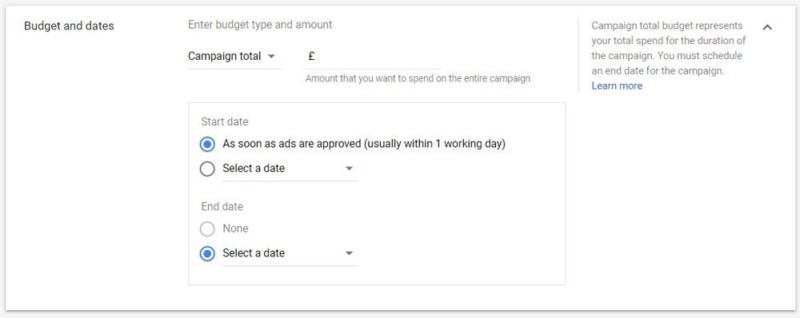
So how do you know which option is right for you?
Here’s how we like to choose:
If you’re running a ‘burst campaign’ (a short term campaign that typically lasts no more than 4 weeks), then we always recommend using a ‘Campaign Total‘ budget.
If, however, you’re going to be running a campaign for the foreseeable future, almost like an evergreen campaign, then we recommend choosing the ‘Daily Budget‘ option.
You’ll also see a section just below the budget options, where you can select a start and end date.
Again, what you choose here will depend on the type of campaign that you’re running:
- Burst Campaign – set a start and end date
- Ongoing/Evergreen Campaign – DON’T select a start and end date
Bidding Strategy
I could go very deep on this topic! But for the purposes of this guide, a bidding strategy is essentially how you want Google/YouTube to optimize your ads for maximum impact and how you pay.
I’ve chosen to run a Brand Awareness and Reach Campaign, so the only Bidding Strategy available to me in this example is Target CPM, which means that I’ll set a target cost for Google/YouTube to optimize my campaign for, in order to receive 1000 impressions of my ad.

If, however, you chose a different campaign goal, you’d have access to different bidding strategies, such as Maximum CPV (Cost Per View), where you decide how much you’re prepared to pay for 1 person to watch your ad.

Networks
Now it’s time to decide where you want your ads to show on the YouTube platform.

Depending on the objective of your campaign and your campaign subtype, some of these options may be unavailable to you. So, typically, here’s how to choose which Networks to show your YouTube Ads on:
- YouTube Search Results – Video Discovery Ads
- YouTube Videos – In-Stream Ads (Skippable and Unskippable), Bumper Ads
- Video Partners on the Display Network – NEVER USE! (Selecting this option will use up the majority of your budget very quickly!)
Languages
This is pretty straightforward! Just choose the language that your ideal customers speak! Yep, it’s that simple!

Content Exclusions
Now you need to choose an Inventory Type, which is essentially a filter that lets your ads show on certain types of video content that YouTube Creators upload. The option you choose here is going to depend on how you want your brand to be perceived, as you might be ok with your ads showing on videos of an ‘evocative nature’, in which case, choose ‘Expanded Inventory‘.
Typically though, we choose ‘Standard Inventory‘, just to be on the safe side. And, to give credit to YouTube, they are getting much better at blocking ‘risque’ content on the platform.
But if you want to be really safe, just choose ‘Limited Inventory‘ from the options. Just bear in mind that the more you limit your inventory, the slightly more expensive it’s going to be to run your ads.
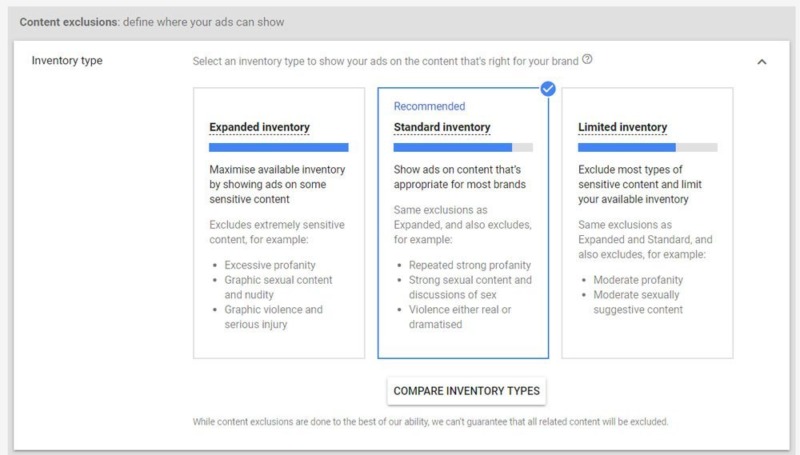
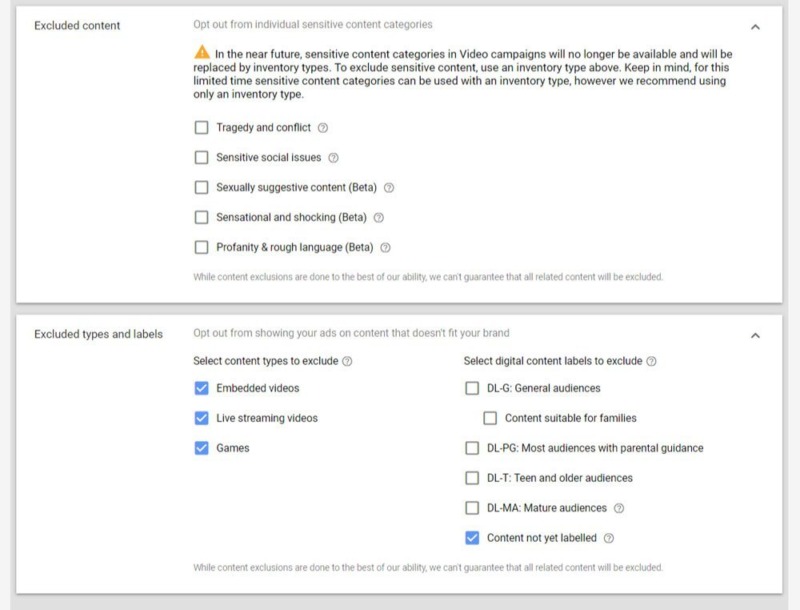
The next 2 options to define are ‘Excluded Content‘ and ‘Excluded Types and Labels‘.
The ‘Inventory Type‘ in the previous section tends to cover a lot of this. So we tend to leave ‘Excluded Content‘ as default. Also bear in mind that, at the time of writing this guide, the ‘Excluded Content’ options will soon be removed.
With the ‘Excluded Types and Labels‘ options, we tend to just tick the following options where we don’t want our ads to show:
- Embedded Videos
- Live Streaming Videos
- Games
Additional Settings
There are some additional settings you can play around with, but when just starting a campaign, it’s best to cast a wide net, so we tend to leave these options alone with a first campaign.
Once we have some data after running campaigns for a few weeks, then we’ll come back into these additional settings and make some changes. But for now, you can leave these settings as default, unless you really feel that you need to male some adjustments to them.

Ad Group Name
Now it’s time to set up your Ad Group. So, as we covered a little earlier in this guide, the Ad Group is where you define your targeting. And when you’re naming your Ad Group’s, it’s best to include the targeting within the Ad Group name, to make things easier to manage; which is particularly important once you’ve got a good number of Ad Groups up and running.
Again, there’s no right or wrong Ad Group naming conventions, but here’s the format we like to use:
[OFFER] | [TARGETING TYPE] | [TARGETING DETAIL]
For example:
2 For 1 Offer Nov 2019 | In-Market | Hotels & Accommodation
Whatever naming convention you use, just make sure you name your Ad Groups in a way that means something to you.

People Targeting – Who You Want To Reach With Your Ads
The next step is to set up your ‘People’ targeting, which includes:
- Demographics
- Audience
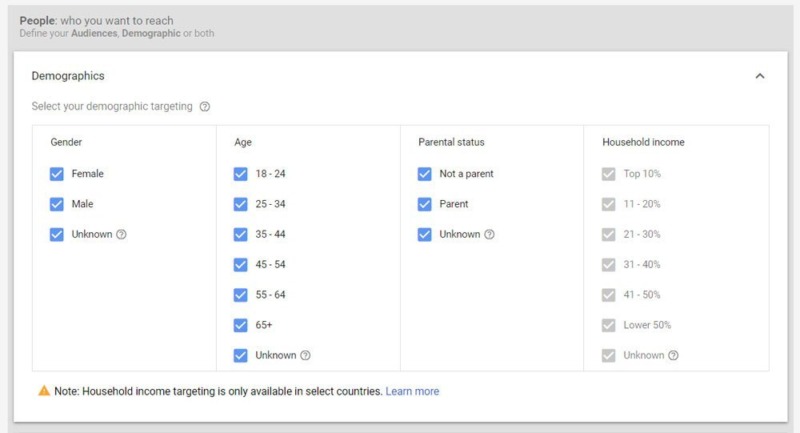
 Demographics
The Demographics section allows you to filter the targeting of who sees your ads, based on your ideal customers. With Demographics, you are able to define:
- Gender
- Age
- Parental Status
- Household Income (select countries only)
Audiences
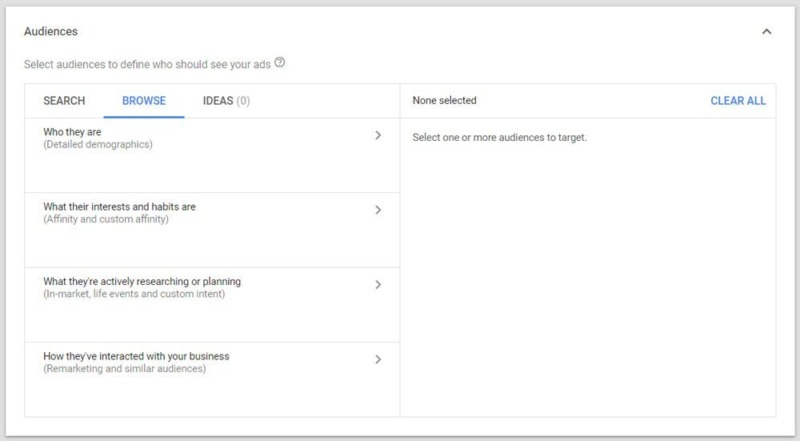
The Audiences targeting allows you to choose from a number of different audience types, based on Google’s data of its users. We covered this a little earlier in this guide, but to give you a refresher, here’s what you’re able to define with Audience targeting:
- Detailed Demographics (such as marital status, home ownership status and education)
- Affinity (interests and habits)
- In-Market and Life Events (people who are ready to make a purchase and life events such as graduation, marriage, etc.)
- Remarketing (people who have interacted with your business)
As I mentioned earlier in this guide, I’d recommend NOT ‘layering’ People targeting (Demographics and Audiences) when you’re first getting started, because it’s really going to limit the potential of your YouTube Ads, as well as the data that you’re able to pull in, if you were to cast a wider net.
So, if you’re using People Targeting, you’re defining the people who you want to see your ads, no matter what content they’re watching.
But, with Content Targeting (the next targeting option), you’re actually targeting the content where your ads will show, no matter who the people are that are watching.
This does make it sound a bit like the Content Targeting is a waste of time! But, if you think about it, the people who are watching, for example, a video about ‘best places to visit in the Lake District’, you can be pretty sure that they’re going on holiday to the Lake District at some point in the near future. People who are going to China are unlikely going to be watching a video about places to visit in the Lake District!
So let’s now take another look at the Content Targeting options quickly, as we covered these earlier on in this guide. Content Targeting allows you to define where your ads show based on:
- Keywords
- Topics
- Placements

If you do decide to use Content Targeting, then we recommend just choosing ONE of these options per Campaign (Keywords, Topics or Placements), so as to give your ads the best possible chance of success. You can then refine the targeting later on once you’ve got some data.
Bidding
Setting the bid for your Ad Group will differ depending on the goal of your Campaign, as well as the Campaign subtype that you’ve selected. For the example in this guide, I’m using a Brand Awareness and Reach Campaign, so the only bidding option I’m able to use is Target CPM (Cost Per Thousand Impressions).

Regarding how much you should set your bids for, whichever type of Campaign you’re running, will very much depend on several factors, such as your ACV (Average Cart Value), your LTV (Lifetime Value), CR (Conversion Rate – how many people you convert from a lead/enquirer into a paying customer).
If you’re running a different Campaign Type and Subtype, you might be able to set your bidding based on how much you’re prepared to pay for a single view of your YouTube Ad.

Once you know these sorts of metrics, and you know how much you’re able to pay to acquire a new customer/booking (and still be profitable), then you can input this data into your Campaign and the algorithm will optimize your Campaign to meet these figures so that you stay profitable.
To give you some figures to get you started though, if you’re running a Campaign that allows you to set a Maximum CPV, then I’d recommend setting this CPV bid to somewhere between £0.10 – £0.20 to begin with. Then once you have some data and analytics after the Campaign has been running for a few days, you can adjust this CPV bid down to better match the results you’re getting. We tend to see CPV’s of between £0.02 and £0.10.
Create Your Video Ad
Here comes the exciting part – creating your YouTube Ad itself!
So the first thing you want to do is make sure your video ad is uploaded onto your YouTube Channel as ‘Unlisted’. Then simply copy and paste the URL of the video into the search bar under the ‘Create Your Ad’ section.
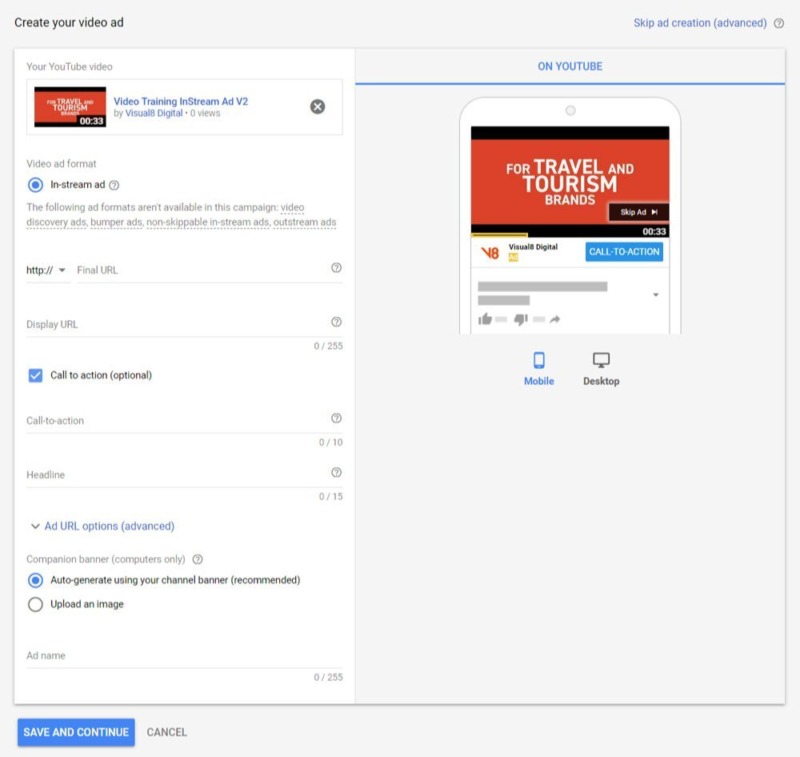
The options you see when you’re setting up your Campaign may differ to screenshot above, because, again, it will depend on your Campaign and Campaign Subtype settings.
But let’s go through the options in the above screenshot, which are available for most Campaigns and Campaign Subtypes, to give you a better idea of how to set your first YouTube Ad up:
- Video Ad Format – the options you see here will depend on the type of Campaign you’re setting up
- Final URL – this is the actual URL people will arrive on when they click on a CTA (Call-To-Action) in your YouTube Ad
- Display URL – this is the URL that viewers of your YouTube Ad will actually see, so make your Display URL look as pretty as you can!
- Call-To-Action – this is optional on some campaigns. You have 10 characters to use, such as BOOK NOW or LEARN MORE
- Headline – this should promote your offer; it appears below your YouTube Ad on mobiles and within the ad itself on desktop computers
- Companion Banner – this is a graphic with a CTA and again, promotes your offer, but stays visible to the viewers even if they skip your ad. You can choose to have an auto-generated Companion Banner, or if there’s something specific that you want to show in your banner, then you can create your own; just make sure that its dimensions are 300 x 60 pixels.
As you build out your YouTube Ad, you’ll see a preview of what it’s looking like on the right hand side of your screen, both on mobile and desktop devices, so you can be confident that you’re happy with how your ad looks before you launch it.
The final thing you need to do is name your Ad. As with all the naming conventions we’ve gone through in this guide, there are no hard and fast rules; just make it clear to you, so that you understand the content of the Campaign, Ad Group and Ad.
For your Ads, I recommend using the following naming convention, but feel free to name it in a way that works for you:
[OFFER IN AD] | [VERSION] | [ANGLE/DESCRIPTION]
So, for example:
2 For 1 Nov 2019 Offer | Ver1 | With Voiceover
And you’re done! Just give all the settings of your Campaign a check over to make sure you’re happy with everything. Then click on the blue ‘Save and Continue‘ button at the bottom of the screen.
The “Secret Sauce” to Running Profitable YouTube Ads Campaigns
Phew! So, you’ve got your first YouTube Ad up and running. Now for something super important about running profitable YouTube Ads Campaigns…
I call this the Secret Sauce…
When you’re running YouTube Ads, the ‘Secret Sauce’ to success isn’t some fancy targeting strategy, or campaign objective, although, as you’ve witnessed throughout this Ultimate Guide, these things do make a massive difference to your results.
The ‘Secret Sauce’ to successful running profitable YouTube Ads is actually MINDSET.
I call it the ‘Always Win, Never Lose Mindset’.
Whenever you run YouTube Ads, you either SUCCEED by reaching your ideal customers with a message that resonates with them and turns them into either a lead or a customer…
OR
You gain AD INTELLIGENCE, which will help you WIN more going forwards.
You need to ‘miss the mark’ a few times to see what works and what doesn’t work. If you win, GREAT. if you lose, GREAT – you’ve still won, because you’ve gained AD INTELLIGENCE.
And once you can see what’s working, you can dial in on this targeting, creative, messaging, etc. and start to scale up your Campaigns.
To really drive this Secret Sauce home for you, let’s use an analogy of firing arrows at a target.
The reason some YouTube Ads don’t work is because they throw one huge, gigantic arrow at a target. And unfortunately, 9 times out of 10, this doesn’t produce profitable or meaningful results. And definitely no ROI.

Losing Campaigns |

Winning Campaigns |
Instead, if you want to win with YouTube Ads, you need to use the ‘Always Win, Never Lose Mindset’, throw lots of precision arrows at the target and not be afraid of missing a few times. When you have this mindset, you know that you’ll hit the bullseye.
As Thomas Jefferson once said:
“Nothing can stop the man with the right mental attitude from achieving his goal; nothing on earth can help the man with the wrong mental attitude.“ – Thomas Jefferson
Conclusion
And there you have it! That’s complete the YouTube Ads Ultimate Guide For Travel Marketers.
As with any paid advertising campaign, you can very easily waste a lot of money if you don’t know what you’re doing, targeting the wrong audience, setting the wrong objectives and most importantly, not knowing your metrics and your numbers.
You’ll also need to bear in mind that YouTube Ads requires on-going testing and optimization. You can’t just create one YouTube Ad, launch it and expect to hit a home run right out of the gate.
When you launch your first YouTube Ads Campaign, let it run for at least 7-14 days before you make any amendments to it. Allow your Campaign to collect some data, then analyze the data, and optimize targeting, bidding, etc. based on your results.
You might also like:

